Contact Management Tab: Accounting
View - Contacts - Contact Management - Accounting ![]()
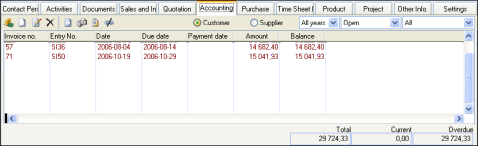
The Accounting tab shows all account entries against the contact person within the Financials. If the contact is a customer, all receivables will show. If the contact is a supplier all liabilities are shown. If the contact is both customer and supplier, you can select which of the lists you want to be shown.
The tab can be used as a sort of 'mini ledger' where you are given an overview of all ledger items as well as the amounts for Total, Current and Overdue. You can register payments and credit notes and you can match open items against closed ones. You can also enter new invoices from the tab. Note that all actions under this tab are registered directly into the Nominal Ledger.
![]() Here you are able to register receipts and payments for open items in
the customer and supplier ledger. Read more about receipts and payments in Entering Receipts and Payments in the Customer and Supplier Ledger.
Here you are able to register receipts and payments for open items in
the customer and supplier ledger. Read more about receipts and payments in Entering Receipts and Payments in the Customer and Supplier Ledger.
![]() Tip! It is also possible to register
receipts and payments in the journal register. Read more in Entering Payments and Receipts in Journal Entry.
Tip! It is also possible to register
receipts and payments in the journal register. Read more in Entering Payments and Receipts in Journal Entry.
![]() By
clicking on the New button you
are able to register sales invoices (for the customer) or purchase invoices
(for the supplier) in the journal register. You can also choose to do
so in the journal register window, which you can read more about in Journal Entries in the Customer and Supplier Ledger.
By
clicking on the New button you
are able to register sales invoices (for the customer) or purchase invoices
(for the supplier) in the journal register. You can also choose to do
so in the journal register window, which you can read more about in Journal Entries in the Customer and Supplier Ledger.
![]() Click on the Edit button if you
wish to edit the customer or supplier ledger. This can also be done in
either the Customers Ledger or
the Suppliers Ledger, which can
be found under the Accounting
focus area. Read more Editing Customer and Supplier Ledger Items.
Click on the Edit button if you
wish to edit the customer or supplier ledger. This can also be done in
either the Customers Ledger or
the Suppliers Ledger, which can
be found under the Accounting
focus area. Read more Editing Customer and Supplier Ledger Items.
![]() By clicking here you are able to invoice a credit note, which is then
sent to Financials. Read more
about Financials Financials.
By clicking here you are able to invoice a credit note, which is then
sent to Financials. Read more
about Financials Financials.
![]() Here you are able to open the marked invoice, and eventually edit the
invoice information. Read more about Order/Invoice in Sales and Invoicing.
Here you are able to open the marked invoice, and eventually edit the
invoice information. Read more about Order/Invoice in Sales and Invoicing.
![]() If the contact that you have opened is a supplier, you are able to click
on this button in order to go to the purchase register and view the information
that is connected to the marked invoice. Read more about the Invoice Module in The Purchase Module.
If the contact that you have opened is a supplier, you are able to click
on this button in order to go to the purchase register and view the information
that is connected to the marked invoice. Read more about the Invoice Module in The Purchase Module.
![]() If you click on this button you will be taken to Financials
where the marked journal is stored. Read more in Financials.
If you click on this button you will be taken to Financials
where the marked journal is stored. Read more in Financials.
![]() With the Match/link items function, you are able to connect or close multiple
open items against each other. In order to do so the particular items
must be registered for the same customer or supplier. You can close items
(Match) if the total of the item
is equal to zero. If the total of the item is not equal to zero, they
will be connected (Linked) and
can be closed at a later point. Read more in Matching/Linking open Invoices.
With the Match/link items function, you are able to connect or close multiple
open items against each other. In order to do so the particular items
must be registered for the same customer or supplier. You can close items
(Match) if the total of the item
is equal to zero. If the total of the item is not equal to zero, they
will be connected (Linked) and
can be closed at a later point. Read more in Matching/Linking open Invoices.
The drop-down list to the right of the icons can be used to filter and select the information that you want to be displayed. You are able to select which year you wish to display the information for, whether you wish to display open or closed items or both, and finally you are also able to select if you would like to display information about the contact that is connected to Invoice, Bank/Petty ash, Credit Note or Invoice/Credit note.
![]() Tip! For an overview of all outstanding
amounts, we recommend that you use the customer and supplier ledgers,
in which all customers and suppliers are incorporated within the same
list. You can also generate payment reminders, debt collection claims
and interest calculations from this module.
Tip! For an overview of all outstanding
amounts, we recommend that you use the customer and supplier ledgers,
in which all customers and suppliers are incorporated within the same
list. You can also generate payment reminders, debt collection claims
and interest calculations from this module.
Entering payments in the Accounting tab
- Select the paid item from the list.
-
 Click Receipts/Payments.
 - Check that the Date agrees with the date on which you received/made the payment.
- Select N/C according
to the form of payment that has been used.
Each selection is linked to a specific journal type that is to be debited. These alternatives can be edited from the Accounting Settings. - Adjust the amount in the Receipt or Payment columns if it differs from the amount invoiced.
- Enter any Payment reminder
fee in the appropriate column.
This figure is registered in a separate account and not in the main receivable. - Click OK to transfer the journal to the Nominal Ledger.
![]() The journal is transferred to the Nominal Ledger.
The journal is transferred to the Nominal Ledger.
Entering invoices in the Accounting tab
-
 Click New.
 - Enter the Invoice number.
- Check that the Invoice date and Due date match those on the invoice.
- Select if the invoice is To be Remitted (only applies when registering a purchase invoice)
- Enter the amount to be registered as a cost in the purchase account. After you have entered the amount, a new journal line is created.
- If you wish to spread the amount across other accounts you can use new lines for this.
- Select Show all N/Cs
if you wish to select between other accounts rather than the purchasing
account.
If you wish to register a double entry N/C in this line you must enter negative figures. - Click OK.
![]() The journal is created with the journal type Purchase invoice (for suppliers)
or Sales invoice (for customers) and is transferred to the Nominal Ledger.
The journal is created with the journal type Purchase invoice (for suppliers)
or Sales invoice (for customers) and is transferred to the Nominal Ledger.
Entering credit notes in the Accounting tab
-
 Select the item
to be credited from the list and click Create
credit note.
Select the item
to be credited from the list and click Create
credit note. - Check that the Date agrees with the credit note.
- Click OK.
![]() The journal is created with the journal type Purchase credit (for suppliers)
or Sales credit (for customers) and is transferred to the Nominal Ledger.
The journal is created with the journal type Purchase credit (for suppliers)
or Sales credit (for customers) and is transferred to the Nominal Ledger.
Read more about: