The Wizard for linking Contacts to a Document
View - Document - New document ![]()
When creating documents you can either link contacts manually via the Contacts tab in the document card, or you can add a selection of contacts with the help of a wizard. If the document is to be merged with a small number of contacts, it will be easiest to add these contacts/contact persons manually, whereas it would be quicker to use the wizard when wanting to link a larger selection of contacts that are to receive the document.
![]() Note! The wizard will only start if
no contacts/contact persons were added manually in the Contacts
tab.
Note! The wizard will only start if
no contacts/contact persons were added manually in the Contacts
tab.
The wizard is activated from the document card by clicking on the Create/Merge button. The program first checks whether any contacts were added manually in the Contacts tab; if not, the wizard will start. In the first step of the wizard you need to select the document which the contact(s) should be linked to. If you select One Contact the document will be created and the contact's information will be merged into the document, provided that the document contains the necessary merge fields for this.
If you select More than one contact (mail merge) you are taken to a new screen where you can enter criteria for the selection of contacts to be linked into the document. For example, you can select that all contacts in a specific line of business or Category should receive the document. When the document has been completed it will be available in the Documents tab of the contact card for all involved contacts.
![]() Note! It is possible to link contacts
and contact persons once the document has been created, but a message
will then be displayed stating that the document has already been created
and that new contact information will not be merged into the document.
Note! It is possible to link contacts
and contact persons once the document has been created, but a message
will then be displayed stating that the document has already been created
and that new contact information will not be merged into the document.
How to link in several contacts via the wizard
- Go to View - Document - New Document.
- Select Contact from the drop-down list Type.
- Click Create/merge.
- Select More than one contact (mail merge) and click Next.
- Make your selection for the contacts. See more about this in Filters.
- Click OK.
- Edit the selection manually as required, to add or remove
individual contacts.
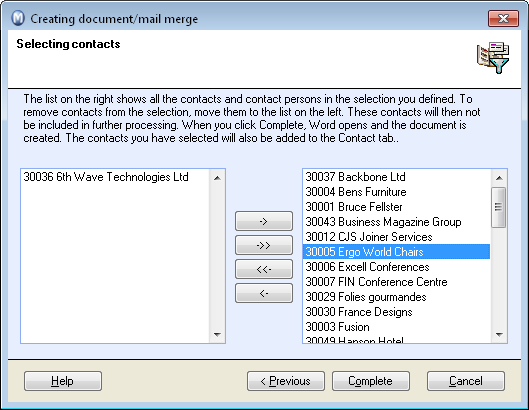
- Click Complete.
- If you wish, you can edit the document that opens.
- Click Save and close the document.
![]() The selected contacts have now been merged
into the document and the Contacts
tab in the document card is updated with the chosen contacts and contact
persons.
The selected contacts have now been merged
into the document and the Contacts
tab in the document card is updated with the chosen contacts and contact
persons.
![]() Tip! If you would like to view all
merged contacts you need to click on the ABC
button (View merged data). You can browse among the contacts by clicking
the arrows in the toolbar.
Tip! If you would like to view all
merged contacts you need to click on the ABC
button (View merged data). You can browse among the contacts by clicking
the arrows in the toolbar.
Read more about: