 New activity. Find
out more here.
New activity. Find
out more here.The Toolbar
From the toolbar you can create new activities, save changes, delete items and much more. Find out more about tools in Mamut screens here.
New activity. Find
out more here.
![]() Check availability.
By clicking on this icon you can a see a Schedule
for employees and resources linked to the activity. Find
out more here.
Check availability.
By clicking on this icon you can a see a Schedule
for employees and resources linked to the activity. Find
out more here.
 Duplicate activity.
 Open the related element in MS Outlook.
This icon will only show if you have activated the Outlook integration. To find out more about Outlook integration,
click here.
Open the related element in MS Outlook.
This icon will only show if you have activated the Outlook integration. To find out more about Outlook integration,
click here.
 Send e-mail:
Opens a new e-mail message. Contacts linked to the activity, which have
a valid e-mail address, will automatically be added as recipients. The
subject of the activity will be inserted as the subject of the e-mail.
In the e-mail, you can attach any documents linked to the activity.
Send e-mail:
Opens a new e-mail message. Contacts linked to the activity, which have
a valid e-mail address, will automatically be added as recipients. The
subject of the activity will be inserted as the subject of the e-mail.
In the e-mail, you can attach any documents linked to the activity.
 User Settings.
The User Settings allow you to specify how you want to work with
activities, e.g. how the windows for activity management look or which
default values you want present when creating a new activity.
Find out more here.
User Settings.
The User Settings allow you to specify how you want to work with
activities, e.g. how the windows for activity management look or which
default values you want present when creating a new activity.
Find out more here.
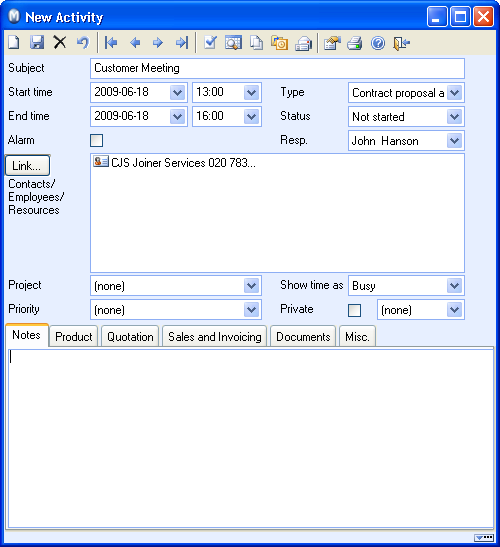
Below you will find a description of every field. If some of the fields are missing from your screen, this could be because the tab card/note field is maximised. Clicking [---] at the bottom of the screen will make more fields visible.
 Tip! By default,
the program chooses an interval for between which dates activities
are displayed in the activity list. If you cannot find an activity in
the list this could be due to the activities' date being outside the preset
time interval.
Tip! By default,
the program chooses an interval for between which dates activities
are displayed in the activity list. If you cannot find an activity in
the list this could be due to the activities' date being outside the preset
time interval.
Field descriptions
Subject: A short description of the nature of the activity.
Start time: Set a date and time for when the activity is to commence. The time does not have to be accurate for activities in the Task list. Find out more here.
End time: This is adjusted automatically in relation to the start time, based on the company settings for activities where you are able to choose a Default duration for new activities. This duration can be overridden by changing the proposed end time.
Alarm: Select whether the activity is to be fitted with an alarm and how long before the start time the alarm is to go off.
 Note! If you have selected to transfer
activities to Microsoft Outlook you cannot select when the alarm is to
go off. Instead, the alarm will work according to the settings in Microsoft
Outlook.
Note! If you have selected to transfer
activities to Microsoft Outlook you cannot select when the alarm is to
go off. Instead, the alarm will work according to the settings in Microsoft
Outlook.
Type: Activity types are an important categorisation for extracting statistics. Additionally, they help you to filter the Activity list. The activity type also controls whether the activity will be available in the list for Customer Service, Product Service and Telemarketing. You can view the activity in the graphic calendar, either in the actual calendar or the task list. The setting for this is made on the Activity card via the Misc. tab.
Status: Choose from pre-defined statuses to follow-up on the progress of activities. You can also create your own status types by clicking View - Settings - Company - Properties Register.
Tip! For fields that contain selection
alternatives in the properties register, is called Change
in properties register. You
can right click the fields to enter or change new alternatives directly.
Example: In Order registration,
in the Text tab you right click
in the drop- down list next to Select
text, and click
Change in properties register.
When you set an activity to completed in the Activity list, the status will automatically change to 'Completed'. If you would rather that this action assigns a different status, then you can select an alternative status through the company settings for activities.
Resp: Everyone listed within the Employee Register can be set as the person responsible for an activity. Through the user access rights you can also bar employees from editing any activities other than their own.
Link: Clicking this button allows you to link Contacts, Employees and Resources that are involved in the activity. Read more about this window.
Project: If the activity is to be linked to one of your projects you can select this here. If you are creating an activity directly from the Project module, this field is filled automatically.
Tip! If you have selected a project,
you can right-click in the field and select Go
to project.
Priority: Select between High, Medium and Low priority, or (none) if you prefer not to prioritise your activities.
Show time as: Select how the activity should be displayed in the calendar: Busy, Free or Out. This is particularly relevant when linking employees to other activities.
Private: You can use the Private activity function to limit other users' access to the activity. If you check the box, only users with sufficient access rights will be able to view the activity's detailed information. Please note that an activity defined as private will be displayed in the calendar, so that other users can see that you are busy. The Super User will always be able to view the activity's detailed information. Learn more about User Access Rights.
Colour Code: By using the drop down list next to the Private check box, you can associate the activity with a Colour - if the activity type can be displayed in the calendar. You can define a default colour for each activity type in the Properties Register. This way, you will not be required to define a colour for each individual activity.
Tabs in the Activity Register
Notes: Enter any notes you may have in connection with the activity here. The user settings for activities allow you to decide whether information about Time and Name of the user to appear for each entered note.
Product: Here you can add products that are linked to the activity.
This card is also used in connection with Product Service, where you enter which products are included in the service, any possible Resources needed for the service and possible working hours accumulated. This information can then be directly transferred to invoicing.
If you want to create a regular invoice, we recommend that you do so from the Sales and Invoicing tab.
Quotation: You can prepare a quotation directly from within the activity. This requires that the activity is linked to one or more contacts. The list of quotations created from the activity can be filtered out through the Status drop-down list. The Link button opens a list of existing quotations which can be linked to the activity.
Tip! You can create a new
Quotation or a Quotation repeating
directly from the activity. These will then be linked to the activity.
Sales and Invoicing: You can create orders directly from the activity. The list of orders created from the activity can be filtered out through the Status drop-down list. The Link button opens a list of existing orders and you can link these to the activity.
Purchase: Under the Purchase tab you can either create a new purchase based on the activity or you can link in an existing one.
Time Sheet Input: Here, you can register time sheet lines that are linked to the activity or link in existing time sheets.
Documents: Create documents or link in existing documents that are relevant to the activity from here. The list of documents created from the activity can be filtered out through the Status drop-down list.
 You can import documents with the help of the relevant button. Find
out more about the Import of documents here.
You can import documents with the help of the relevant button. Find
out more about the Import of documents here.
Misc.: Here you will find your user-defined fields. These can be activated and customised through the company settings for activities. Additionally, you can also determine whether the activity will be displayed in the task list or the actual calendar.
 Delete link:
If you would like to remove a link to an existing quotation, order/invoice
or purchase, you can do so by clicking on the Delete
link button in the appropriate
tab of the activity card. The link to the item is removed so that you
cannot open it from the activity anymore.
Delete link:
If you would like to remove a link to an existing quotation, order/invoice
or purchase, you can do so by clicking on the Delete
link button in the appropriate
tab of the activity card. The link to the item is removed so that you
cannot open it from the activity anymore.
Note! The actual quotation, order/invoice
or purchase is not deleted.
Read more about: