Getting Started with Your Blog
Step 1: Set up your Blog
Follow the steps below to create and define the settings for your blog.
How to set up a blog
Log in as the administrator.
On your website's frontpage, select Blog
from the drop-down list Add in
your eZ Publish Administration menu and click Create
here.

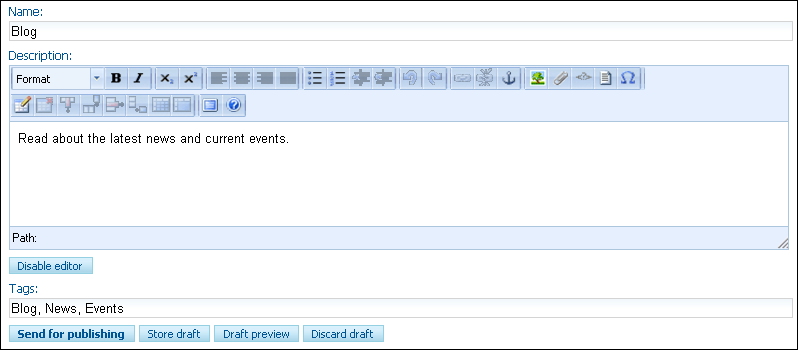
In the screen that opens, enter a Name
for your new blog which will be displayed in the user menu. You should
also write a Description, which
will be displayed on the right-hand side of the blog's main page. You
can also register Tags for easy
accessibility via the search function or site map.

Click Publish.
 The blog has now been created and can be
accessed from your top user menu. You can now proceed with creating your
first blog post (step 2).
Step 2: Write a Blog Post
Follow the steps below to add content to your newly created blog.
How to write a blog post
Log in as the administrator and navigate to your blog
via the user menu.
Select Blog post
from the eZ Publish Administration menu and click the Create
here button.

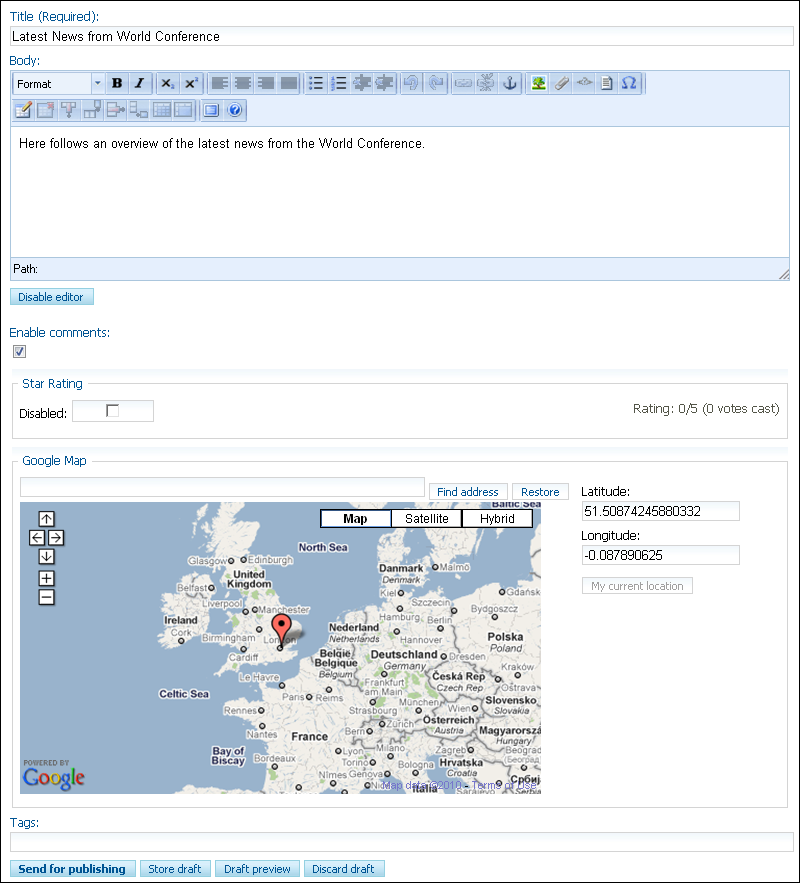
In the screen that opens, enter information in the following
fields:

Title: Enter a title for your blog post.
Body: Here you are able to write the main content of the blog.
For more information on text formatting, read about text management here.
Enable comments: Choose
whether the reader is able to write comments regarding the blog, by ticking
the box Enable comments.
Star rating: Enabling
this feature will give the reader the possibility to rate the blog post.
The reader can rate the post from 0 to 5 stars.
Google Map: If you have
activated the Google Maps feature in Control
panel - Site Settings, you can display a Google Map in your blog
post. Simply enter the address in the field above the map and click Find address. You can also select location
by clicking directly on the map or entering latitude and longitude. Read
more about this feature here.
Tags: Enter keywords for the blog post for the search function
and site map on the website. Separate keywords or phrases with a comma
[,].
When you have entered the relevant information, click
Publish.
 The blog post has been posted and published.
You can at any time edit or delete your blog, blog posts or blog comments
by following the steps below.
Step 3: Editing your Blog, Blog Posts or Blog Post
Comments
Follow the procedure below if you wish to add or edit your blog post
or its content.
How to edit your blog, blog posts or comments
Log in as the administrator and navigate to your blog
via the user menu. All posts published on your blog will be displayed
in chronological order.
 Edit entire blog: If you wish to edit
the entire blog, click Edit in
the eZ Publish Administration menu.
 Edit individual blog post: Click
the title of the post you wish to edit and click Edit
in the following screen.
 Edit a blog post comment: Click
the title of the post in question and click Edit
in the upper-right corner of the comments field below the blog post.
Make the necessary changes and click Publish
to publish your changes.
 Your blog, blog post or blog post comment
has now been updated.
Step 4: Remove Blog, Blog Posts or Blog Post Comments
If you want to delete your blog or any of its contents completely, follow
the procedure below.
Log in as administrator and navigate to your blog via
the user menu. All posts published on your blog will be displayed in chronological
order.
 Remove entire blog:
If you wish to remove the entire blog, click Delete
in the eZ Publish Administration menu. You will be asked if you are sure
you want to delete the blog and all of its content.
 Remove individual blog post: Click
the title of the post you wish to remove and click Delete
in the following screen. Click Confirm
if you are sure you want to delete the post.
 Remove a
blog post comment: Click the title of the post in question and
click Remove in the upper right
corner of the comments field below the blog post. Click Confirm
if you are sure you want to delete the comment.
 The content has now been removed from your
website.
Read more about:
Blog
Components in Mamut eZ Publish


 The blog has now been created and can be
accessed from your top user menu. You can now proceed with creating your
first blog post (step 2).
