By using the tool bar, you can among other things, create links to other locations on your website, to external websites, e-mail addresses or FTP servers.

 Insert/edit link: Highlight the
text you want use as a link and click the button.

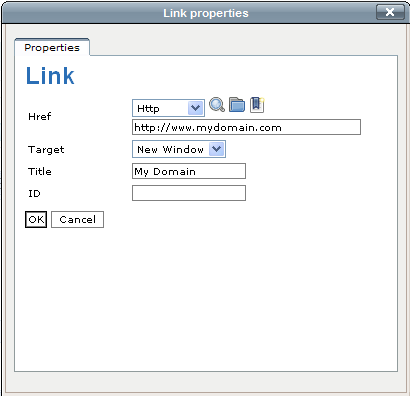
The fields in the Link Properties Window:
Href: Choose
which type of link to insert. Http
is a normal website address, Mail
is a link to an e-mail address, and File
inserts a link to a file and so on.
Tip! If you wish to link to a calendar or to a news item on
your page, click the ![]() button and select the object you wish to link to.
button and select the object you wish to link to.
Target: Choose this if you want to open the link in a new window. It is common to open links to external websites in new windows.
Title: Write the text describing the link. The text will be displayed when the visitor places the mouse cursor directly above the link.
ID: More advanced users can use the ID field to create links by using the Anchor functionality. Read more under Anchor.

 Insert link/remove link: Highlight
the link text to activate the buttons. Click the buttons if you wish to
insert or remove a link.
 Anchor:
An anchor lets you create links within a text. Anchors are used both in
Microsoft Word and Open Office.
 Insert/Edit Image:
In the Upload tab, click the Browse button to insert an image.
The following information can be entered:
Name: The name will appear when you place the mouse cursor on
the image.
Alternative text: Will be displayed instead of name when you
place the mouse cursor on the image.
Caption: The caption is displayed beneath the image.
Location: Choose where on your website the image will be displayed. You can use the default value to insert the image into the object you are currently working on. You can also choose to make the image available in different folders on your website.
Select the Browse tab in order to insert an object that has already been uploaded to your website. By clicking the sub-menu Media, you can access your File Library. Click on one of the categories in order to select a file. If you place the mouse cursor above the Preview link, you can display a thumbnail of the image. Click OK when you have selected which object you wish to insert.
Read more about the file library here.
 Insert custom tag: You can insert
fact boxes, quotes and separators by clicking this button.
Fact box: The fact box can be adjusted in the following way: Enter left to place the element to the left, right to place it to the right or centre to centre the element.
Quote: A quote can be adjusted in the following way: Enter left to place the element to the left, right to place it to the right or centre to centre the element.
Sup: Superscript.
Sub: Subscript.
Separator: Separator.
Embed video: Lets you embed a video clip from YouTube or Vimeo. Enter the address to the clip in the URL field, define Width, Height, and whether or not the clip should be displayed Inline. Read more about embedded video clips here.
 Insert literal text: This tool
can be used to insert text that you do not want to format. The text is
inserted with the type face Courier, which means that all characters are
equally long. The text can be used to create tables or as an example of
programming code. The functionality is the same as <pre> and <code>
in XHTML.
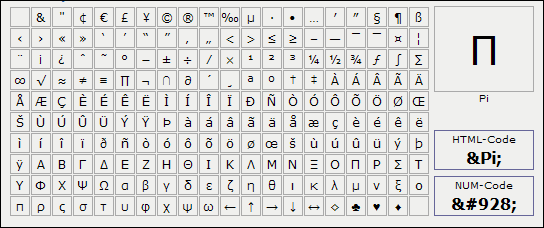
 Insert special characters: Click
the button to open a panel containing all special characters that are
difficult to insert by using the keyboard.

![]() Insert a table: Click the button
to insert a table.
Insert a table: Click the button
to insert a table.
 Click this button to open a help window.
Read more about: