Creating Credit Charges
View - Accounting - Credit
charges ![]()
You can charge customers for lost interest by using credit charges. Lost interest due to customers making late payments can accumulate to significant amounts in the course of a year.
In the settings for credit charges you define which settings will apply to your company. The settings can be adjusted via View - Settings - Accounting - Customer & Supplier Ledger. Here you are able to define the interest rate to be applied to late payments, the conditions of applying these charges along with fixed text for both domestic and international customers.
When you select Credit charges, a wizard will open and you can choose between creating new credit charges and printing copies of previous credit charges.
How to create new credit charges
- Go to View - Accounting - Credit Charges.
- Select Create new credit
charge and click Next.
- Make the selections to limit the number of accounts
receivables suggested for credit charging.
You can set one or more of the following selections:
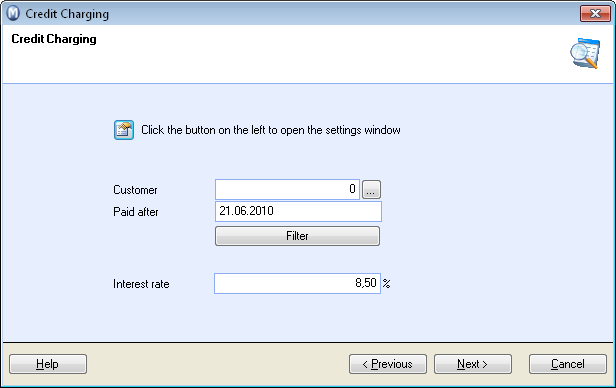
Customer: Select a customer.
Paid after: Overdue accounts that were paid after your selected date will be included in the selection. (If the number of interest-free days is exceeded).
Click Filter if you wish to make more advanced selections.
The interest rate is automatically retrieved from the credit charging settings, which can be found via View - Settings - Accounting - Customer & Supplier Ledger. You can override here it if required.
- Click Next to
view what accounts receivables are suggested based on the selection.
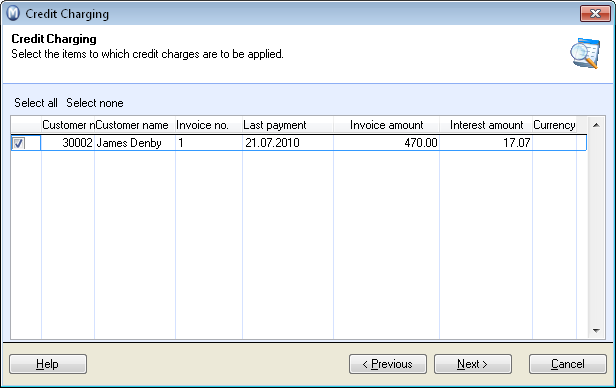
- Click Next if you are happy with the changes suggested. You will see a preview of the Interest Proposal report. Click Previous to go back and make changes to the selection. You can also remove markings on checked lines on suggested accounts receivables. Accounts receivables you have unchecked will not be subject to credit charging this time.
- After printing the Interest Proposal, you can print the actual credit charges. Select a print medium. Click Next and then Complete to approve credit charges.
![]() A journal will now be created for each credit
charge. The journals will have open items status in the Customer and Supplier
ledger.
A journal will now be created for each credit
charge. The journals will have open items status in the Customer and Supplier
ledger.
Printing copies of previous credit charges
- Go to View - Accounting - Credit Charges.
- Select Print copies of previous credit charges and click Next.
- Make the necessary selections. See point 3 above for more information and a list of selections.
- Click Next to view which credit charges are suggested based on your selection.
- Select the credit charge you wish to print. You can only print one credit charge at a time.
- Click Next and select print media.
- Click Complete to print the copy.
![]() The copy will now be printed. Click Previous to go back and print more copies,
or click Cancel to close the wizard
when you have printed your copies.
The copy will now be printed. Click Previous to go back and print more copies,
or click Cancel to close the wizard
when you have printed your copies.
Read more about: