User Settings for Journal Entry
View
- Accounting - Journal Entry ![]()
The User Settings allow you to customise the functions and appearance of the journal entry window. These settings can be different for each individual user.
You can define up to five different setups per user within the user settings, and these are connected to the user setup that can be selected from the drop-down list left of the User Settings button in the journal entry window. The user setup for Currency and Customer and Supplier Ledger are already customised for entering, respectively, currency journals and Customer & Supplier Ledger journals, but all user setups can be customised to show the desired columns and functions. You also have the opportunity to rename the user setups within the Function tab in the User Settings.
![]() In order to customise a setup within the user settings, go to the journal
entry window via View - Accounting - Journal
Entry, and then select the setup you wish to customise from the
drop-down list at the top of the journal entry window, then click on the
User Settings button.
In order to customise a setup within the user settings, go to the journal
entry window via View - Accounting - Journal
Entry, and then select the setup you wish to customise from the
drop-down list at the top of the journal entry window, then click on the
User Settings button.
You can also access the User Settings via View - Settings - User - Settings per Module - Journal Entry, but note that you will then be opening the user settings for the user setup that you last used within the journal entry. Then name of the actual user setup will be displayed at the top of the window.
Default
This tab allows you to customise the module to suit your needs. You can choose between three pre-defined settings, all displaying different fields and columns.
Simple: Simplifies the window by only displaying required fields.
Normal: Displays standard fields and functions.
Advanced: Displays all available fields and additional functions.
If you choose one of these settings, you will be able to view the pre-selected options by browsing the other tabs.
![]() Tip! In the other tabs, you can customise
the layout manually, instead of using the pre-defined settings.
Tip! In the other tabs, you can customise
the layout manually, instead of using the pre-defined settings.
Columns
Under Show column, select which columns you want to display in the registration window by checking the relevant boxes.
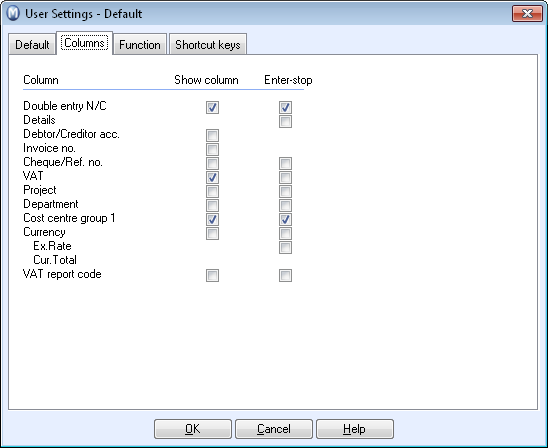
Enter-stop: The check boxes below Enter-stop enable you to decide where the cursor is to move to when you press [ENTER]. Setting this according to your needs may save a lot of key strokes.
Read more about the different columns in The Columns in Journal Entry
Function
In the Function tab, you can set the general guidelines for journal entry. Check the boxes for the functions that you wish to activate:
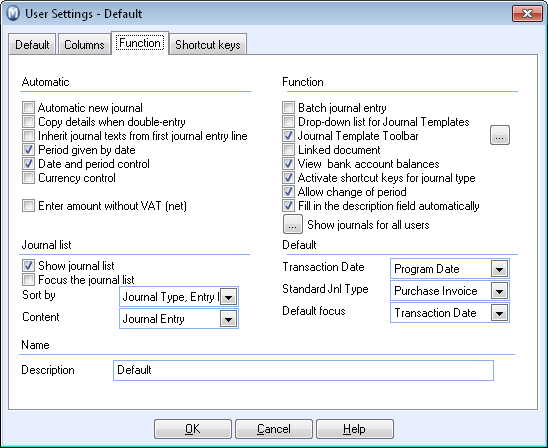
Automatic
Automatic new journal automatically allocates a new journal number in the next line after balance is achieved. You can either use this function or press [+] when you have entered the amount in the last entry line of a journal to obtain a new journal number.
Copy details when double-entry means that the journal descriptions on the entry line are automatically copied to the double-entry N/C too.
Inherit journal texts from first journal entry line: Select this option to have the same text on all journal entry lines. The function takes the text from the first journal entry line and duplicates it to all journal entry lines.
If you select Period given by date, the correct period will automatically be registered when you enter a date.
Date and period control issues a warning when the journal date is outside the selected period.
Currency control issues a warning if the current date is beyond the period you have selected for the relevant currency. (Settings - Accounting - Module settings - Currency).
Enter amount without VAT (net) enables you to enter the net amounts for accounts that are set up with a VAT code. The VAT is calculated and added as a separate line in journal entry.
![]() Tip! Amounts
entered into an account with a VAT code set as a Foreign
service are always entered as net, even if this setting has been
activated.
Tip! Amounts
entered into an account with a VAT code set as a Foreign
service are always entered as net, even if this setting has been
activated.
You can access this setting by clicking View
- Settings - Accounting - Accounting Settings - Maintenance of VAT rates.
Select the VAT code and click Edit.
In the tab Foreign service, check
the box Foreign service.
Journal List
Show journal list: Displays a list in the bottom half of the journal entry window which lets you search for already registered journals and display the information at the bottom of the window. You can also search for journals that have already been transferred to Financials/Nominal Ledger.
Focus the journal list: The most recent journal entered is automatically displayed at the top of the journal list.
Sort by: Choose if you want to sort the journal list by Entry number or Journal type.
Content: Define the contents of the journal list. If you select Posting list, you will be able to view the journal entries posted to the account you have highlighted in the top half of the journal entry window for the selected year. The journal list displays journal entries in the journal entry module and in Financials/Nominal Ledger.
Function
Batch journal entry allows batch transfer to the Nominal ledger across journal type and period.
Drop-down list for Journal templates: Journal templates simplify standard journal entry and accrual accounting for costs. The drop-down list for Journal entries gives you access to those journal templates in your company database that are modifiable, e.g. those user-defined journal templates that you created via the wizard for journal entries. Read more in Journal Templates.
Journal Template Toolbar activates buttons and short cuts that enable you to register single journal items. When clicking on the search button, you can also add the most frequently used user-defined journal templates in addition to the ones that are standardised within the program. Read more in Settings for the Journal Templates Toolbar.
Linked document enables attaching documents to journal entries.
View bank account balances: Enters a line in the Journal Entry window, which shows the balance for the Bank Current Account and Petty Cash accounts. The accounts shown are those marked Bank/Petty Cash in the chart of accounts. If you have more than nine accounts of this type, only the nine accounts with the lowest account numbers will be displayed. Read more in Chart of Accounts.
Activate shortcut keys for journal type: If you remove the check, it will no longer be possible to change the journal type by pressing the shortcut keys [/] or [*].
Allow change of period: By un-checking the box, you will no longer be able to change the period in the journal entry module.
Fill in the description field automatically: By un-checking the box, the description field will no longer be filled out automatically.
Show journals for all users: Click the Show journals for all users button if you want access to journal items entered by other users. These journal items will then be transferred to you. Not all users have access to view all journal entries; however this can be overridden if you are the administrator or super user.
Default
Journal Date: Select if you want the program date or the last used date to be used as the journal date when opening the journal entry.
Standard JT: Select what journal type you want to be suggested as the default each time you open an empty journal entry.
Default focus: Select where the cursor is to be positioned when creating a new journal.
Name
Description: Here you can enter the name or the description of the setup. The name will be displayed in the drop-down list to the left of the User Settings button in the Journal Entry toolbar.
Shortcuts keys
The shortcut keys show the available shortcuts for Journal Entry. You can also find these in Shortcuts for Journal Entry.
Read more about: