User Settings for Contact Management
View - Contacts - Contact
Management - User Settings ![]()
![]() You can use the User settings
button on the toolbar to tailor the contact management window to your
own requirements. You can also select View
- Settings - User - Settings per Module, and click Contact.
You can use the User settings
button on the toolbar to tailor the contact management window to your
own requirements. You can also select View
- Settings - User - Settings per Module, and click Contact.
Here you can view the fields and tabs you are able to select when working with contact management. You can also set up default values for newly created contacts. Default values are available for Our reference, Status, Line of business and Category. You can also select whether a new contact is to be automatically created as a Customer, Supplier, Partner or Personal. An example of another setting that you can select is whether the program is to automatically copy a new address into empty address types.
The window consists of three tabs: Default setup, Contact card and Tab.
Default Setup
You can select from three pre-defined settings.
Standard: Keeps the screen as clear as possible showing only some of the fields.
Normal: Displays standard fields and makes standard functions available.
Advanced: Displays all available fields and more functionality.
Click the relevant button to select an option. If you wish to customise the window, you can do so under Tab.
Contact Register
This is where you specify guidelines and default values for newly created contacts.
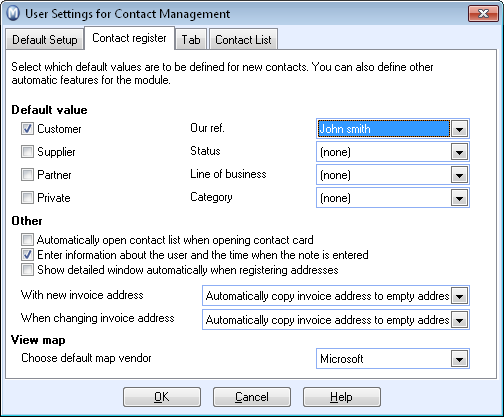
Default value: These values will be automatically filled in when you create new contacts. You can save a lot of time if new contacts can be given default values. The default values are not permanent and can be overridden for each individual contact. You can select whether the contact will be set up as Customer, Supplier, Partner or Private. You can also set default values for Our reference, Status, Line of business and Category.
![]() Note! By right-clicking in the drop-down
lists for Status, Line of Business or Category, you can edit the values
in the Properties register.
Note! By right-clicking in the drop-down
lists for Status, Line of Business or Category, you can edit the values
in the Properties register.
Other: You can select whether you want:
- Inactive contacts to be displayed in the contact list.
- The contact list to open automatically when the contact card is opened.
- Information on the user and time to be registered when Notes are added.
- A detailed window to appear automatically when entering an address.
Entering a new invoice address: Select what the program should do when a new invoice address is added to the contact. The three options are: Automatically copy to empty address types, select the address types to be updated with the address, or never copy to other address types.
Changing an invoice address: You have the same three options when changing invoice addresses.
Map Search: Select map service provider. The setting refers to the features View map and View Travel Route to contacts or contact persons. An equivalent setting can be found in the user settings for contact person. Read more in View Map and Travel Route to the Contact
Tab
You can customise which tabs will appear in the contact management window by ticking the boxes next to the various tabs. We recommend that you un-tick any tabs you do not use to keep the window as clear as possible. By clicking one of the buttons in the Default Setup tab, the contents will change accordingly.
Under Other you can select whether the totals in the Quotation, Sales and Invoicing and Purchase tabs shall be displayed including VAT.
Contact List
Choose which columns you want to display in the contact list and define the settings. Please note that the window cannot display more than 5 columns.
Sorting when the contact list is opened: How the list is sorted when you open the contact list. In the window, you can choose how to sort the list by clicking the column headers. Please note that if you have un-checked columns included in the sorting, the sorting criteria will revert to the preceding settings.
Default selection in contact list: Pre-defined selection when the contact list is opened. Use this setting if you also want to view inactive contacts. You can override the setting when the window is open.
![]() Tip! The system administrator can use
the access controls to limit or increase the users' access to the user
settings.
Tip! The system administrator can use
the access controls to limit or increase the users' access to the user
settings.
Read more about:
User Settings for Contact Person