The Employee Register
View - Employee Register
![]()
The Employee register is where you store all important information about your employees, such as name, address, telephone numbers, job title etc. In addition, you can also register information about the employee's qualifications, absences, activities, documents, notes and insert pictures of your employees.
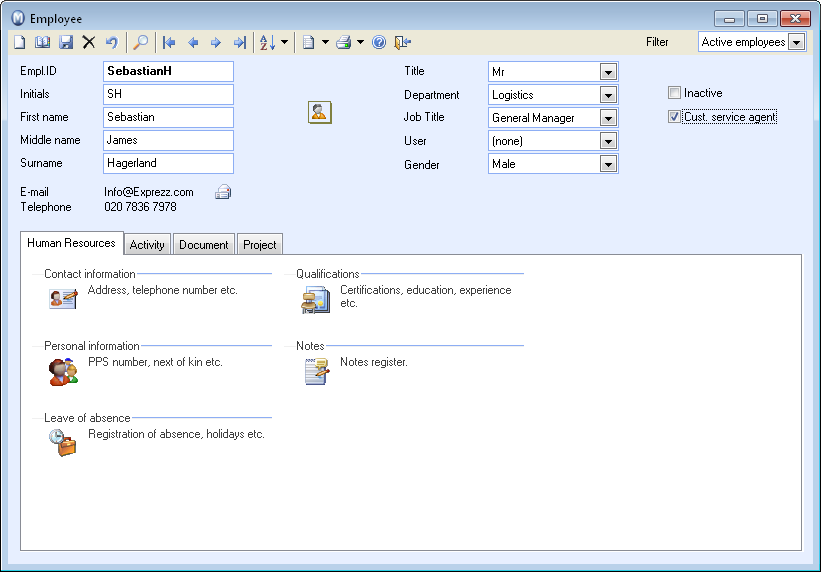
Each employee has their own Employee card. This card consists of two components: the top half contains general information about the employee and the lower section consists of various tabs with more detailed information. To register a new employee you simply click New.
In the top half of the Employee card you enter details such as Employee ID, Initials, First name, Middle name and Surname. If the employee is linked to a Project, select the appropriate project from the drop-down list.
![]() If you want to insert a picture of the employee use the Click
to insert picture button. Click Find
picture in the screen that opens. (The picture will need to have
been saved locally on your machine in order for this function to work).
If you want to insert a picture of the employee use the Click
to insert picture button. Click Find
picture in the screen that opens. (The picture will need to have
been saved locally on your machine in order for this function to work).
You can select the employees job Title in the Job title drop-down list. If the job title is not listed in the selection, you can register it in the Properties register by right-clicking the mouse in the drop-down list and selecting Change in properties register.
Employees that have left the company can be set to the Inactive status. Employees that have been Inactive at the end of the year they left + another year can be deleted.
![]() By clicking on the arrow button to the right of Create
activity you can set up customised activities where you decide
on the activity content and which modules the activity template should
be available in.
By clicking on the arrow button to the right of Create
activity you can set up customised activities where you decide
on the activity content and which modules the activity template should
be available in.
![]() At the top of the Employee card you will find the Settings
button. Clicking on this button will allow you to register the
employee's standard working hours, lunch hour and total working hours
per day. By default, the absence register will enter absences in whole
working days, but if you mainly register absences by the hour, you can
enable this by ticking the box.
At the top of the Employee card you will find the Settings
button. Clicking on this button will allow you to register the
employee's standard working hours, lunch hour and total working hours
per day. By default, the absence register will enter absences in whole
working days, but if you mainly register absences by the hour, you can
enable this by ticking the box.
If the employee is also registered as a user within the program, you can link user and employee via the User drop-down list. Read more about this here.
![]() Note! If the employee is to be listed
as Our ref. in the Sales and Invoicing and Contact management card, select
that the employee is a Customer service
agent.
Note! If the employee is to be listed
as Our ref. in the Sales and Invoicing and Contact management card, select
that the employee is a Customer service
agent.
Read more about adding information in the Employee Register tabs:
Employee Register Tab: Human Resources
Employee Register Tab: Activity
Employee Register Tab: Document
Employee Register Tab: Project
Read more about: