User Settings for Sales and Invoicing
View - Settings - User - Settings per Module - Sales and Invoicing ![]()
Via the different tabs under user settings you can customise the appearance of your screen for Sales and Invoicing, allowing you to customise the screen to your needs.
![]() Note! User Settings only apply to the
current user and do not affect the settings for other users.
Note! User Settings only apply to the
current user and do not affect the settings for other users.
![]() You open user settings by going to View
- Settings - User and selecting Sales and Invoicing in the Settings per Module tab or directly in the module by using the settings icon in the toolbar.
You open user settings by going to View
- Settings - User and selecting Sales and Invoicing in the Settings per Module tab or directly in the module by using the settings icon in the toolbar.
![]() Quotation! Please note that the company
settings for the quotation module are grouped together with the company
settings for sales and invoicing. However, the quotation module has its
own user settings. Read more in User Settings for Quotation.
Quotation! Please note that the company
settings for the quotation module are grouped together with the company
settings for sales and invoicing. However, the quotation module has its
own user settings. Read more in User Settings for Quotation.
Default Setup
You are able to define the appearance of the Sales and Invoicing screen. There are three pre-defined settings available.
Simple: Simplifies the screen as much as possible and displays mandatory fields.
Normal: Shows default fields and makes default functions available.
Advanced: Shows all available fields and more functionality.
Click on the relevant button to select an option. The screen for Sales and Invoicing will then change accordingly.
![]() Tip! From the other three tabs you
can change your setup manually rather than using predefined settings.
Tip! From the other three tabs you
can change your setup manually rather than using predefined settings.
Order
Here you can select what is to be displayed in the main window and in the footer, and you select certain functions.
In the Detailed main window all details for the top half of the main card are shown, no matter which tab is active. If you remove the tick from the check box, the user will not be able to see the information in the main card other than the order number and the contact’s phone number and name.
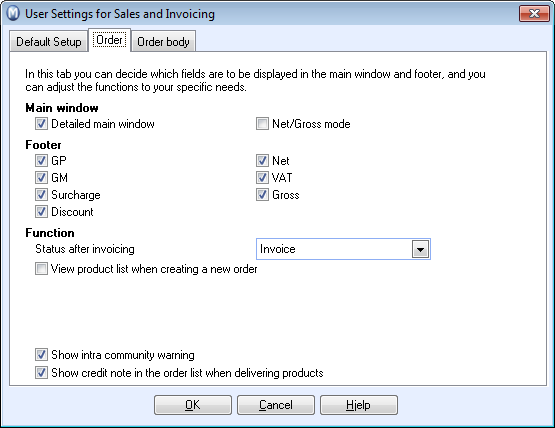
Net/Gross mode: In the top half of the order card there is a drop-down list where you can select to see the order amount as net or gross. If you remove the tick you will simplify the screen and remove the option (net mode is default).
Status after invoicing: An invoice receives the status Invoiced after invoicing. You can change this to Order, if you prefer.
View product list when creating a new order: Automatically opens the product list when a new order is created.
Show intra community warning: This check box only applies to customers without a VAT number. A warning will appear when adding a VAT code for intra community supply of products/services to a product when there is no VAT no. recorded for that customer.
Show credit note in the order list when delivering products: Via this check box you can decide whether the order list with pending product deliveries shall contain credit notes. You can find the order list in the focus area Sales by clicking the Deliver Products icon.
Order body
Here you select which Column settings to display in the Sales and Invoicing card. Choose the columns you want displayed. Note that selecting all will reduce the space for each column. Most users only display a selection of the columns. By un-checking boxes a simpler screen picture is presented and you only display a few columns that are relevant to you.
Footer of product tab: Select which fields you want in the product line tab. This is the footer for each product. The order will still display GP and GM for the whole order at the bottom.
Read more about: