How to Create a Remittance File
View - Accounting - Supplier
ledger - Remittance ![]()
When working with the remittance wizard, you can choose if you wish to use manual remittance by printing payment forms that you send to your bank, or automatic remittance by creating a remittance file which can be sent to your bank electronically.
To remit your supplier payments electronically, you require a valid agreement with your bank. The payments will be transferred as a file to the bank and you will receive a return file from the bank which can be used to post the transactions.
Read more in Getting Started with Automatic Remittance.
Read more in Getting Started with Manual Remittance.
How to generate a remittance file
- Select View - Accounting - Supplier Ledger - Remittance.
- Select remittance format. If you select the format Payment forms/Common Giro, no remittance file will be generated. Read more about this below.
- Only payments due before: Select a due date in order to filter your payments.
- Click Next to view which items are suggested based on your selection. Click Filter in the top right corner of the window in order to limit the number of payments that are displayed.
-
 Any errors detected in the items are displayed in
the Error column. You are able
to edit the items by double clicking on the Edit
button.
Any errors detected in the items are displayed in
the Error column. You are able
to edit the items by double clicking on the Edit
button. - If you want to link a credit note to one of the items,
select the option Display unreconciled
credit notes in order to display available credit notes in the
Credit Notes screen. Select one
of the items by clicking it. Credit notes registered for the same supplier
will be selected automatically in the screen at the bottom of the window.
Click the Match/link items
button next to the credit note you wish to link to the item. The amount
of the item will then be reduced with the amount of the credit note and
the credit note will disappear from the lower screen. If the credit note
credits the entire invoice amount in the item you have selected, the invoice
will disappear entirely from the Invoices
for payment screen as well.
the Match/link items
button next to the credit note you wish to link to the item. The amount
of the item will then be reduced with the amount of the credit note and
the credit note will disappear from the lower screen. If the credit note
credits the entire invoice amount in the item you have selected, the invoice
will disappear entirely from the Invoices
for payment screen as well.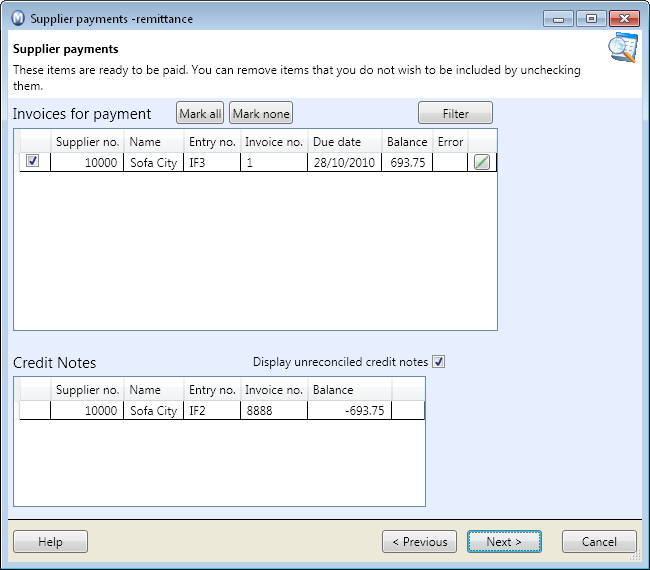
- You can deselect the payments you wish to exclude from the payment in the Invoices for payment screen.
- Click Next if you are happy with the items that are suggested. A report preview of Payment proposals will be displayed. Click the red cross in the upper-right corner to close the window.
- Click Next.
You can now choose where to store the file in the Folder field as well as define a file name in the File name field. You can also enter an URL of online bank (Internet address). The settings you defined in the remittance settings are predefined, but you can change the settings if you wish. - Click Next. If you entered the URL of the online bank and are connected to the Internet, you can transfer the file immediately. Alternatively, you can import the bank file.
- Click Complete to update the Supplier ledger.
![]() All items in the selection will be marked
as sent to remittance.
All items in the selection will be marked
as sent to remittance.
How to print remittance forms for manual remittance
- View - Accounting - Supplier Ledger - Remittance.
- Choose the format Payment forms/ Common Giro. Read more about manual remittance in Remittance - Bank Payment.
- Complete steps 3 to 8 in the procedure above.
- You can now choose to preview the remittance file or send it to the printer. If you want to use a different printer from your default printer, click Select printer. You will now be able to select a different printer in a separate window.
- Click Complete. When you have approved the printout, the Supplier ledger will be updated.
![]() All items in the selection will be printed.
You can send the forms to the bank and update your accounts manually.
All items in the selection will be printed.
You can send the forms to the bank and update your accounts manually.
Invalid recipient address: If the program returns an error message regarding an invalid recipient address, you should attempt to re-enter the contact's Invoice address.
Remittance of part payments: You can make part payments for an item by overwriting the amount in the Balance column in the Remittance wizard. The part payment will not reduce the original items amount.
![]() Note! When remitting international
payments you must register information in the field The
amount applies to the ledger item. This field can be accessed by
clicking the Edit button in the
remittance wizard, in the Supplier payments
- remittance window. You can also edit ledger items via the views
Ledger list, List
of Customers, List of Suppliers
and Aged Analysis in the ledger
modules. Read more in Editing Customer and Supplier Ledger Items.
Note! When remitting international
payments you must register information in the field The
amount applies to the ledger item. This field can be accessed by
clicking the Edit button in the
remittance wizard, in the Supplier payments
- remittance window. You can also edit ledger items via the views
Ledger list, List
of Customers, List of Suppliers
and Aged Analysis in the ledger
modules. Read more in Editing Customer and Supplier Ledger Items.
Read more about: