Product Register Tab: Discount
View - Product - Product Register - Discount ![]()
You can offer discounts on each individual product based on various criteria defined in the Discount tab in the product register.
Different Discount Types in the Discount Tab
Product has no discounts: Select this check box if you do not wish to associate the product with any discount. The option removes all discounts linked to the product, including discounts defined for the product group in the discount register. Read more in The Discount Register.
No individual discounts for product: Select this check box if it should not be possible to register an individual discount for this specific product. Please note that a discount will be applied for the product if you have defined a discount for the product group in the discount register.
![]() Note! You can
overrule these settings in the Sales/Invoicing
module by manually entering discounts directly on the order line. The
discount entered here will overrule all other discounts. This is possible
because of the discount hierarchy that is used in Mamut Business Software.
Read more in Discounts.
Note! You can
overrule these settings in the Sales/Invoicing
module by manually entering discounts directly on the order line. The
discount entered here will overrule all other discounts. This is possible
because of the discount hierarchy that is used in Mamut Business Software.
Read more in Discounts.
The Discount tab contains three additional tabs:
- Category
- Contact
- Quantity
Use these tabs to create different combinations of discounts.
![]() Note! You must
first activate these discount types in the company settings for product.
Read more in Company Settings for Product.
Note! You must
first activate these discount types in the company settings for product.
Read more in Company Settings for Product.

Category
You can offer discounts to one or more customer categories. You can assign your contacts to different categories via the Category drop-down list in the contact management module.
How to Give Discounts to a Category of Customers
-
Select the Category
tab and click New.

- The To Date field lets you choose when the discount will expire. If you do not enter a date, the discount will be applied until you delete the discount line.
-
In the Category
drop-down list, select the customer category that will receive the discount.
Tip! If you wish to enter a new discount for the same category, you must first delete the old discount for that category before you can register a new discount. - Select if you wish to offer the Discount in % or as a Fixed Price and enter the value.
- Click OK to save the discount.
![]() The settings will now be added as a separate
line in the tab. You can now enter new discounts for other categories.
The settings will now be added as a separate
line in the tab. You can now enter new discounts for other categories.
![]() In the discount register, you can access a discount
matrix where you can predefine discounts for various combinations of categories
and product groups. Read more in The Discount Register.
In the discount register, you can access a discount
matrix where you can predefine discounts for various combinations of categories
and product groups. Read more in The Discount Register.
Contact
You can also offer discounts to one or more individual contacts.
How to Give Discounts to a Contact
-
Select the Contact
tab and click New.
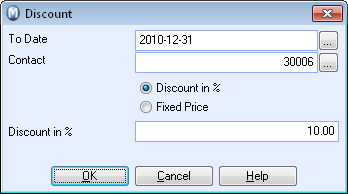
- The To Date field lets you choose when the discount will expire. If you do not enter a date, the discount will be applied until you delete the discount line.
-
In the Contact field,
enter which customer will receive the discount. You can either enter the
contact number directly into the field, or click the search button to
the right of the field and select the contact from the contact list.
Tip! If you wish to enter a new discount for the same contact, you must first delete the old discount for that contact before you can register a new discount. - Select if you wish to offer the Discount in % or as a Fixed Price and enter the value.
- Click OK to save the discount.
![]() The settings will now be added as a separate
line in the tab. You can now enter new discounts for other contacts.
The settings will now be added as a separate
line in the tab. You can now enter new discounts for other contacts.
![]() Tip! You can
define discounts for both categories and specific contacts. If the normal
"distributor" discount is 15%, you can for example choose to
give an extra discount to certain distributors. This is related to the
structure of the discount hierarchy in Mamut Business Software.
Read more about the discount hierarchy in The Discount Register.
Tip! You can
define discounts for both categories and specific contacts. If the normal
"distributor" discount is 15%, you can for example choose to
give an extra discount to certain distributors. This is related to the
structure of the discount hierarchy in Mamut Business Software.
Read more about the discount hierarchy in The Discount Register.
Quantity
You can offer quantity discounts on your products. Quantity discounts can either be offered in Steps or From first number. For example, if you select Step, you can decide to sell the first 500 units of a product with a 5% discount while the following 1000 units will be sold with a 7.5% discount.
If you select From first number, the same discount will apply to the entire order.
How to Give Quantity Discounts
-
Select the Quantity
tab and click New.
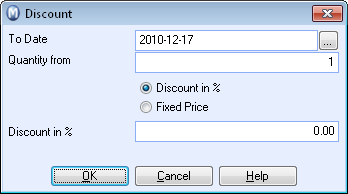
- The To Date field lets you choose when the discount will expire. If you do not enter a date, the discount will be applied until you delete the discount line.
-
In the Quantity from
field, enter the quantity that will trigger the discount.
Tip! If you wish to enter a new discount for the same quantity, you must first delete the old discount before you can register a new discount. - Select if you wish to offer the Discount in % or as a Fixed Price and enter the value.
- Click OK to save the discount.
![]() The settings will now be added as a separate
line in the tab. You can now enter new quantity discounts.
The settings will now be added as a separate
line in the tab. You can now enter new quantity discounts.
![]() Note! If you use a Fixed
Price when defining a discount for either category, contact or
quantity, the system will by default select the lowest value of the Fixed Price in the discount register
and Sales Price in the price calculator.
You can override this from the company settings for product, so that the
fixed price works as a mark-up.
Note! If you use a Fixed
Price when defining a discount for either category, contact or
quantity, the system will by default select the lowest value of the Fixed Price in the discount register
and Sales Price in the price calculator.
You can override this from the company settings for product, so that the
fixed price works as a mark-up.
If you have selected fixed price for any of the above-mentioned discounts,
any other discounts will be added in addition to other discount types.
Read more about: