Contact Person
View - Contacts - Contact
Person ![]()
In the module for Contact Person you are able to register information regarding the contact persons whom you are in contact with at the customer/supplier. It will be easier for you to find the right person to talk to when they are registered.
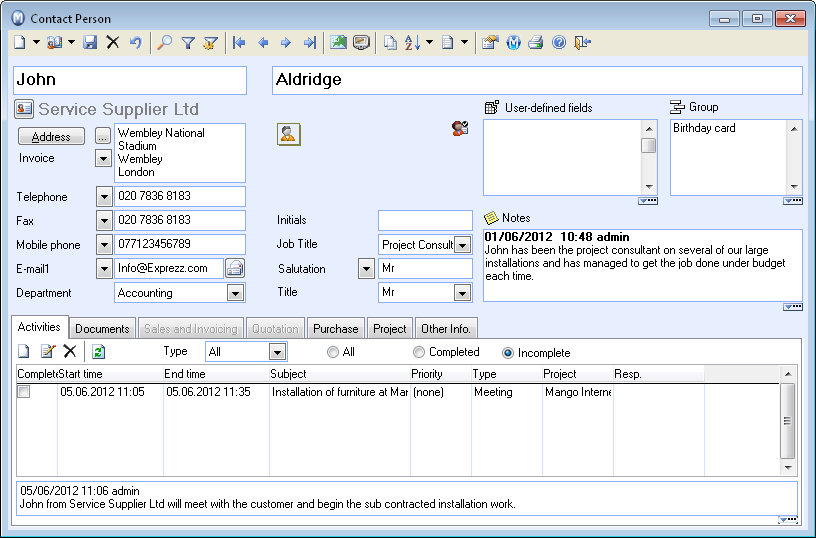
The module for Contact Person can be opened as an independent module by selecting View - Contacts and Contact Person. It is also possible to open the module by double-clicking on a company contact linked to a Contact Person.
In the top half of the screen you register the Contact Person's first name, middle name and surname. If you have chosen for the contact's address to be inherited by the Contact Persons within the User settings for Contact Person, the address will already appear here. If you want to register a different address for the Contact Person, you can do so by typing directly into the address field or by clicking the Address button.
![]() User Settings:
User Settings:
![]() Tip! You can check the box View
column for middle names in the Contact
Persons tab.
Tip! You can check the box View
column for middle names in the Contact
Persons tab.
The Contact Person's telephone number and the E-mail address can be typed directly into the fields for telephone, fax, mobile and e-mail.
![]() You can also insert a picture of the Contact Person by using the click to insert picture icon. The picture
can be in either JPG or BMP format.
You can also insert a picture of the Contact Person by using the click to insert picture icon. The picture
can be in either JPG or BMP format.
Other useful information you can enter is Initials, Job title, Title and Salutation.
![]() Tip! By using the Address Settings,
you can define the set up of addresses, contacts' and contact persons'
names and how they will be displayed on all reports. The settings can
be found under View - Settings - Report
- Address Settings.
Tip! By using the Address Settings,
you can define the set up of addresses, contacts' and contact persons'
names and how they will be displayed on all reports. The settings can
be found under View - Settings - Report
- Address Settings.
The User-defined Groups and Note fields work the same way as in the Contact Person card.
![]() By clicking on the arrow button to the right of the Create
activities buttons you can create customised activities. You decide
on the content for the activity yourself and which modules the activity
template will be available in.
By clicking on the arrow button to the right of the Create
activities buttons you can create customised activities. You decide
on the content for the activity yourself and which modules the activity
template will be available in.
![]() View Map: Click the icon if you want
to view the location of the contact or contact person on a map. The map
opens in a separate window and requires an Internet connection.
View Map: Click the icon if you want
to view the location of the contact or contact person on a map. The map
opens in a separate window and requires an Internet connection.
![]() View Travel Route: Shows the travel
route to the contact with your address as the point of departure. The
feature requires an Internet connection.
View Travel Route: Shows the travel
route to the contact with your address as the point of departure. The
feature requires an Internet connection.
![]() Tip! Choose supplier of map and travel
route services in the user settings for contact persons.
Tip! Choose supplier of map and travel
route services in the user settings for contact persons.
![]() Click Print if you want to print
some contactperson specific reports, for example address labels. A new
window will open where you can choose the report and further define the
desired settings. Read more in About the Report Module.
Click Print if you want to print
some contactperson specific reports, for example address labels. A new
window will open where you can choose the report and further define the
desired settings. Read more in About the Report Module.
The Contact Person is linked to a main contact in the Contact register. Depending on the type (Customer or Supplier) of the main contact, different tabs will be available for the contact person. Tabs can also be made available in the User settings for contact persons. The tabs are identical to the tabs in the Contact register, except the Other info tab.
Click on the links below to read more about the different tabs in the Contact Register:
Contact Management Tab: Activities
Contact Management Tab: Documents
Contact Management Tab: Sales and Invoicing
Contact Management Tab: Quotation
Contact Management Tab: Purchase
Contact Management Tab: Project
Contact Management Tab: Other Info
Read more about: