The Contact Management Register
View - Contacts - Contact Management![]()
The contact card is divided into two components. In the top half, you enter basic information about the contact, and determine which categories the contact will belong to. This categorisation will help you to distinguish between your contacts, so that it will be possible to send them customised material at a later point.
The bottom half of the contact card consists of a number of tabs where you can add relevant information regarding the contact, e.g. data regarding contact persons, activities, documents, sales and invoicing, accounting, projects, purchases and quotations. Read more about the tabs in Tabs in the Contact Register.
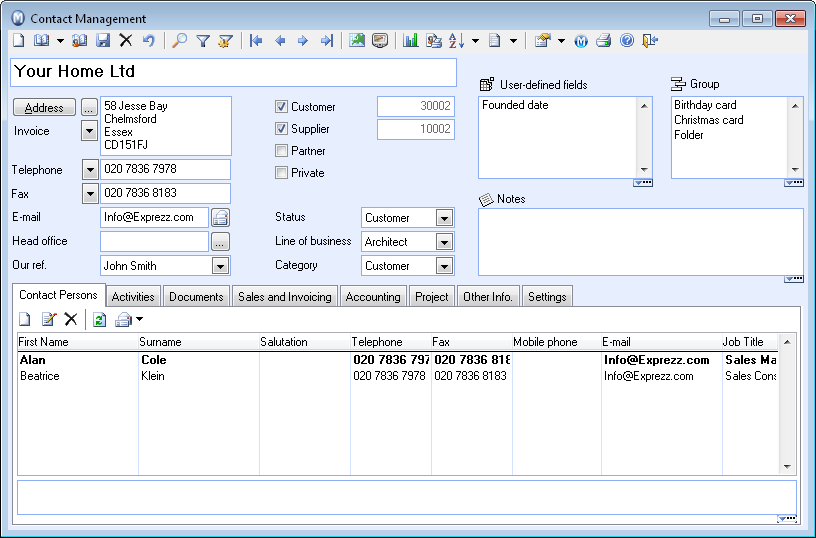
Address: Click the Address button to register the contact's address(es).
Read more about Address, detailed.
Read more about Address settings.
Head office: Use the Head office functionality if you would like deliveries and invoicing to go to different customers. Read more in Head Office/Branch Office.
User-defined fields: You can classify and segment your contacts by using the user-defined fields. Read more in User-defined Fields.
Group: By entering a value in the Group field, you can define accurate and efficient filters. Read more in Groups.
Notes: Here you can enter any type of text. Read more in Note.
![]() .New:
Create a new contact.
.New:
Create a new contact.
![]() .List: Click here to open the contact
list. Within the user settings for contact management you are able to
select whether you want the contact list to display automatically or not
when you open the contact module. It is a useful option if you are looking
for various contacts. If you register new contacts you might want to keep
it turned off.
.List: Click here to open the contact
list. Within the user settings for contact management you are able to
select whether you want the contact list to display automatically or not
when you open the contact module. It is a useful option if you are looking
for various contacts. If you register new contacts you might want to keep
it turned off.
![]() .Contact persons List: Displays a list
of all contact persons.
.Contact persons List: Displays a list
of all contact persons.
![]() .Delete:
You can delete contacts which contain no references to other modules.
An alternative method is to set the contact as Inactive.
.Delete:
You can delete contacts which contain no references to other modules.
An alternative method is to set the contact as Inactive.
![]() .View
map: Click this button to view the contact's address on a map.
The map opens in a separate window and an Internet connection is required
for it to be viewed.
.View
map: Click this button to view the contact's address on a map.
The map opens in a separate window and an Internet connection is required
for it to be viewed.
![]() .View travel route: Displays the travel
route from your address to the contact's address. An Internet connection
is required for it to be viewed.
.View travel route: Displays the travel
route from your address to the contact's address. An Internet connection
is required for it to be viewed.
![]() Tip! You can choose the map service
provider in the user settings for contact management. You can choose between
Yahoo and Google.
Tip! You can choose the map service
provider in the user settings for contact management. You can choose between
Yahoo and Google.
![]() .The Contact
status button supplies an overview of all purchase and sales transactions
that have taken place between the contact and your company. What's more,
it also provides additional key figures. This overview will give you quick
access to the contacts sales history, and can be useful when you are on
the phone.
.The Contact
status button supplies an overview of all purchase and sales transactions
that have taken place between the contact and your company. What's more,
it also provides additional key figures. This overview will give you quick
access to the contacts sales history, and can be useful when you are on
the phone.
![]() .By clicking the Standard
Document button in the toolbar, you can access a number of document
templates which can be used to create standard documents for individual
contacts.
.By clicking the Standard
Document button in the toolbar, you can access a number of document
templates which can be used to create standard documents for individual
contacts.
![]() .By using the Sorting
button you can sort your contacts in a number of different ways:
By Contact name, Contact
number or Supplier number. Just select the desired sorting criteria
by clicking on the arrow to the right of the sorting button.
.By using the Sorting
button you can sort your contacts in a number of different ways:
By Contact name, Contact
number or Supplier number. Just select the desired sorting criteria
by clicking on the arrow to the right of the sorting button.
![]() .By clicking on the arrow button to
the right of the Create activities buttons
you can create customised activities. You decide on the content for the
activity yourself and which modules the activity template will be available
in.
.By clicking on the arrow button to
the right of the Create activities buttons
you can create customised activities. You decide on the content for the
activity yourself and which modules the activity template will be available
in.
![]()
![]() .Click the User
settings button in the toolbar and select the Contact
card tab. Under the Other
tab you select the check box "Automatically open contact list when
opening the contact card". Click the arrow button in order to access
the Company Settings.
.Click the User
settings button in the toolbar and select the Contact
card tab. Under the Other
tab you select the check box "Automatically open contact list when
opening the contact card". Click the arrow button in order to access
the Company Settings.
![]() Click Print if you want to print
some contact specific reports, for example address labels. A new window
will open where you can choose the report and further define the desired
settings. Read more in About the Report Module.
Click Print if you want to print
some contact specific reports, for example address labels. A new window
will open where you can choose the report and further define the desired
settings. Read more in About the Report Module.
TAPI button: When you click the TAPI button the program will automatically call the phone number in the field belonging to it.
![]() Note! This button will only show if
you have the necessary equipment installed. All drives need to support
TAPI 3.0 or higher and the phone needs to be connected to your computer
via a serial port.
Note! This button will only show if
you have the necessary equipment installed. All drives need to support
TAPI 3.0 or higher and the phone needs to be connected to your computer
via a serial port.
![]() .With Skype
you can ring contacts from the contact or contact person card. You can
also receive phone calls. If the contacts are registered with a Skype name and Skype
number in your contact or contact persons register, the contact's
card will open in connection with Skype calls. Calls to/from existing
contacts are logged as activities so that you can easily access historic
information for the contact later. Read more in
Getting started with Skype.
.With Skype
you can ring contacts from the contact or contact person card. You can
also receive phone calls. If the contacts are registered with a Skype name and Skype
number in your contact or contact persons register, the contact's
card will open in connection with Skype calls. Calls to/from existing
contacts are logged as activities so that you can easily access historic
information for the contact later. Read more in
Getting started with Skype.
Read more about the buttons on the tool bar in Important Tools.
Read more about: