The Purchase Register
View - Purchase Order -
Purchases ![]()
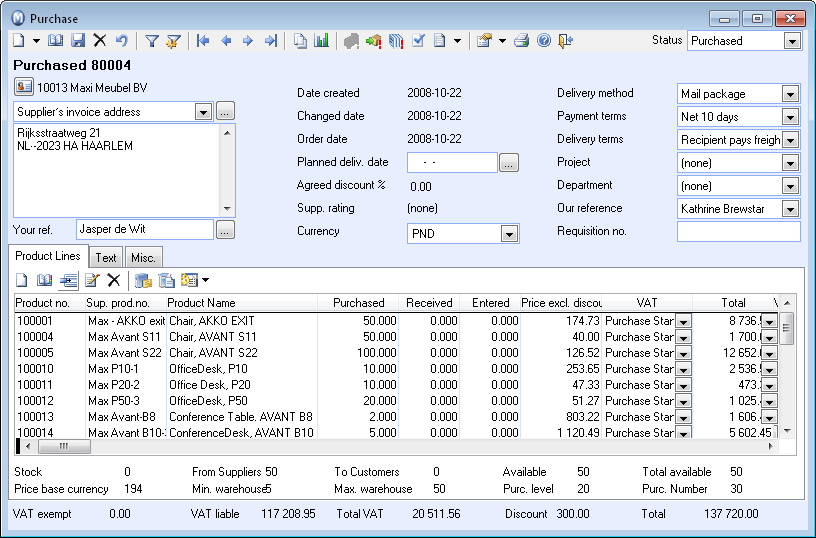
The Purchase window is structured the same as the other registers within the program, with a main window and several tabs with detailed information about the purchase order. The information about the supplier and products is retrieved from the respective registers.
Before you can use the purchase module you have to have created the supplier in the supplier register and the product in the product register.
The toolbar
For more information about the other buttons in the toolbar, see The Desktop Toolbar.
![]() New: Create a new purchase. This method is used when you know which products you are going to order and from which supplier(s).
New: Create a new purchase. This method is used when you know which products you are going to order and from which supplier(s).
Click New using a wizard if you want to create one or more purchases from different suppliers using a wizard. For more information, see The Purchasing Wizard. You can also launch the purchase wizard from the desktop.
![]() List: Displays a list of all purchases.
In the user settings you can choose if you wish to display all purchases,
or if you only wish to display purchases connected to a selected supplier.
List: Displays a list of all purchases.
In the user settings you can choose if you wish to display all purchases,
or if you only wish to display purchases connected to a selected supplier.
![]() Delete: The button has a different
function depending on the status of the purchase.
Delete: The button has a different
function depending on the status of the purchase.
![]() Copy: Launches the wizard copy
purchase order.
Copy: Launches the wizard copy
purchase order.
![]() Transfer to purchased: A purchase
must be Transferred to purchase
before it can be processed further. During this process, the purchase
will be printed, the printout can be sent to your supplier.
Transfer to purchased: A purchase
must be Transferred to purchase
before it can be processed further. During this process, the purchase
will be printed, the printout can be sent to your supplier.
![]() Tip! When a purchase order has been
ordered, you can create a Sales order based on the purchase. You do this
by using the Purchasing wizard.
When this is done a reservation is automatically created between the product
line on the order and the purchase.
Tip! When a purchase order has been
ordered, you can create a Sales order based on the purchase. You do this
by using the Purchasing wizard.
When this is done a reservation is automatically created between the product
line on the order and the purchase.
![]() Register Receive/Return: Registering
the receipt of one or more items. The products will be available in the
warehouse and the purchase's status then changes to received. The receipt can be posted by clicking the icon, or via the warehouse module. It is possible to post all the products in the purchase order when the goods are received if this is selected in the company settings. You can also create an associated Duty/Freight invoice.
Register Receive/Return: Registering
the receipt of one or more items. The products will be available in the
warehouse and the purchase's status then changes to received. The receipt can be posted by clicking the icon, or via the warehouse module. It is possible to post all the products in the purchase order when the goods are received if this is selected in the company settings. You can also create an associated Duty/Freight invoice.
![]() Post Purchase Invoice: When the
entire or part of the receipt has been registered, the purchase is posted
as a supplier invoice. You can only post partly received purchases if
you have selected this option in the company settings. You can also post
a duty/freight invoice. If you want to change the purchase, you can create
a credit note.
Post Purchase Invoice: When the
entire or part of the receipt has been registered, the purchase is posted
as a supplier invoice. You can only post partly received purchases if
you have selected this option in the company settings. You can also post
a duty/freight invoice. If you want to change the purchase, you can create
a credit note.
![]() Purchase Completed: Transfers the
purchase to the status Purchase Completed.
Click Purchase Completed once
you are finished with the purchase. The Status
changes to Processing completed.
This can also be done when the current status is Purchased
and Received.
Purchase Completed: Transfers the
purchase to the status Purchase Completed.
Click Purchase Completed once
you are finished with the purchase. The Status
changes to Processing completed.
This can also be done when the current status is Purchased
and Received.
![]() By clicking on the arrow button to the right of Create activities you can create customised activities. You decide on the content for the activity yourself and also which modules the activity template will be available in.
By clicking on the arrow button to the right of Create activities you can create customised activities. You decide on the content for the activity yourself and also which modules the activity template will be available in.
![]() User Settings:
Opens the user settings for the purchase module. Use the arrow to open
the company settings.
User Settings:
Opens the user settings for the purchase module. Use the arrow to open
the company settings.
![]() Print: The purchases can be printed
to a number of different forms and be sent to printer, e-mail, fax or
preview.
Print: The purchases can be printed
to a number of different forms and be sent to printer, e-mail, fax or
preview.
Status: The drop-down list in the top-right corner displays the different statuses. Read more in The Status Drop-Down List.
Main window fields
(Most of the following information is taken from quotation_reference.htm; note to exchange quotation with purchase)
Address: From the drop-down list, you can choose between the recipient's Invoice address and Delivery address.
Order date: The order date is entered automatically when confirming the purchase by clicking the Transfer to Purchased.
Planned deliv. date: Click the search button to the right of the field to select the planned delivery date.
Agreed discount: If the supplier has a fixed discount, it is shown in this field. Fixed supplier discounts are defined in Contact Management Tab: Settings. Read more about the different discount types in Mamut Business Software in Discounts.
Suppl. rating: If the supplier has a certain rating, it is shown in this field. Supplier ratings are defined in Contact Management Tab: Settings.
Currency: From this drop-down list you can choose between the most commonly used currencies. You can click the search button in order to open the Currency window which allows you to choose from a complete list of currencies. Read more in Currency.
Delivery method: This list is pre-entered with the value defined on the supplier's contact card. If the list doesn't contain the value you need, you can define it via the Properties Register.
Payment terms: The list is pre-entered with the value defined on the supplier's contact card. Select the correct value from the list if you wish to overwrite the default value. Read more in Delivery and Payment Terms.
Delivery terms: This list is pre-entered with the value defined on the supplier's contact card. Select the correct value from the list if you wish to overwrite the default value.
Project: From this drop-down list, you can choose to link the purchase to one of the projects that you have registered in the project register.
Department: From this drop-down list, you can choose to link the purchase to one of the departments that you have registered in your company database's properties register.
Our ref.: Via this drop-down list you can assign an employee from the employee register as responsible for the purchase.
Your ref.: Enter the name of the person or company who will receive the purchase. You can also click the search button if you want to select a contact person who has already been registered within the system's contact register.
Requisition no: In this field you can enter a requisition number to link the purchase to a certain requisition.
Read more about the tabs in the purchase window
Purchases: The Miscellaneous Tab
Purchase: The Product Lines tab
Read more about: